This week I am very excited to share the old family recipe that makes our birthdays epic! My Aunt Dory started making this cake for the monthly family birthday celebrations, and it’s been a favorite of mine ever since. This six-layer birthday ice cream cake is super simple, easy to personalize, and feeds large groups easily! I’ll even share some tips and tricks to help ensure you can make the perfect birthday cake right at home.
For this recipe, you will need:
- 2-3 Cake Mixes (you can make each layer a different flavor if you want!)
- 3 quarts of Ice Cream (Vanilla is always a hit, but again you can make each layer a different flavor if you want)
- Whipped Cream (four small containers, or two large ones)
- Decorations of Choice
My Aunt always used boxed cake mixes, and as a busy mom, I am not ashamed to use them too! If you have the time and inclination, you can substitute a cake mix for your favorite cake recipe.
Step One: Prepare the Cake Batter
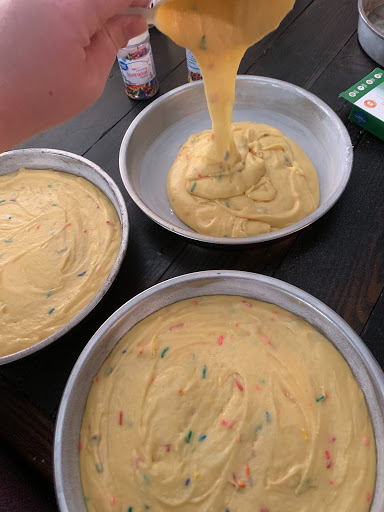
If you’re using a cake mix, there are three easy ways to elevate the batter. First, add one extra egg than is called for in the recipe. This will give your cake a spongy, moist texture that can’t be beat! Second, Beat the eggs for 2-3 minutes at medium speed before you add any other ingredients. This aerates the batter and gives the cake a lighter texture. Third, use milk instead of water! The proteins in the milk give the cake a richer flavor.
Now, here are my favorite simple tricks to elevate my favorite cake mixes:
- Vanilla — add fresh vanilla bean or vanilla extract to bring out a strong vanilla flavor
- Turn Vanilla into Funfetti — add 1.5 oz of sprinkles (about half of one of the small sprinkle shakers) to the batter at the last minute and give it a quick mix. This will distribute the sprinkles so your cake has confetti!
- Turn Vanilla into Spice Cake — add ½ c applesauce, plus a dash of nutmeg, clove, cinnamon, and ginger for a delicious holiday spice cake
- Chocolate — add a tsp of cinnamon or a tbsp of instant espresso powder to intensify the chocolate flavor of your batter!
Once the batter is prepared, spoon into 3 buttered and floured cake rounds and bake according to directions.
Step Two: Prepare the Ice Cream Layers
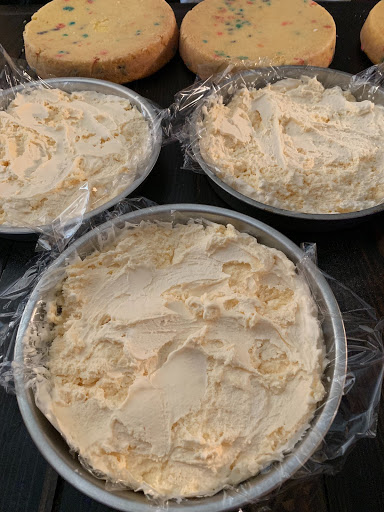
To make the ice cream layers, you will need ice cream, plastic wrap, a cup of hot water, a metal spoon, and clean, empty cake rounds. Line the cake pan with plastic wrap by lightly pressing the wrap into the seam of the pan. Dip the metal spoon in hot water to easily spoon the ice cream into the cake round. It takes about ⅔ of a 1.5-quart ice cream container to fill one layer, so for three layers, I use two 1.5 quart containers of ice cream. Smooth the ice cream into a flat round layer. Cover with plastic wrap and freeze overnight.
Step Three: Cool the Cake Layers
Once the cake has baked (make sure to check the cake with a fork or toothpick – if it comes out clean, the cakes are cooked) leave it in the pan to cool for 10 minutes. This will help the cake solidify enough to remove it from the pan without it breaking apart. Run a butter knife around the edges of the cakes and flip onto cooling racks. If you don’t have a cooling rack, a stone countertop is a great option (really any surface will work). Let the cakes cool down to room temperature. Flip them over when the top is cool and make sure the cakes are cooled thoroughly before putting them in the freezer to freeze overnight.
Why freeze the cakes? Frozen ice cream is HEAVY. If you don’t freeze the cakes they won’t be solid enough to hold the structure, and your cake will collapse. Make sure you leave yourself enough time to freeze overnight so your cake will be solid.
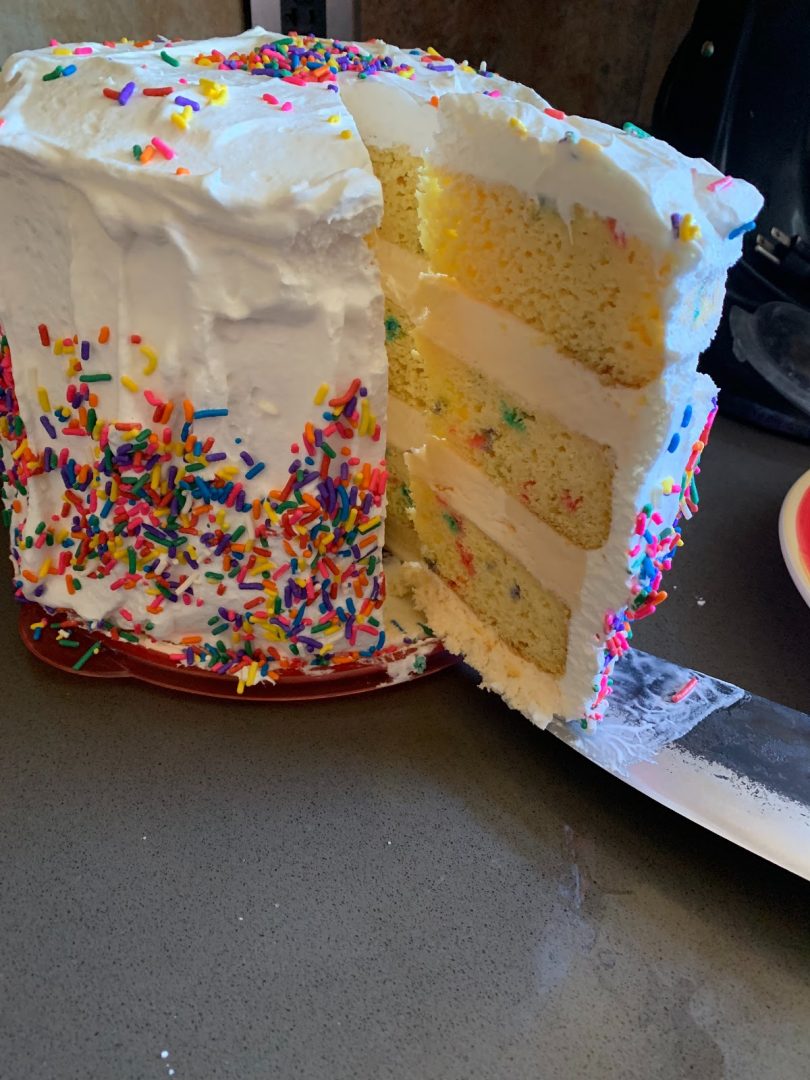
Step Four: Stack the Layers
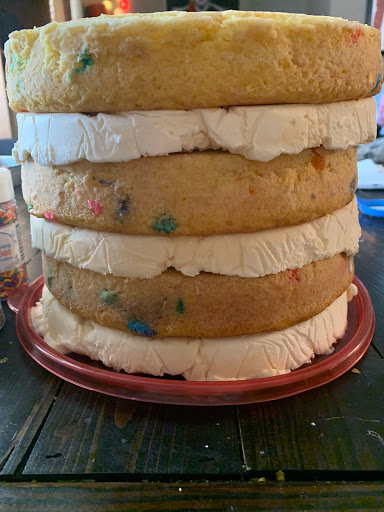
It honestly doesn’t matter if you go ice cream – cake – ice cream or cake – ice cream – cake. Find a flat plate or cake stand and stack your cakes. Since this is an ice cream cake, don’t worry about putting frosting or whipped cream between the layers. The ice cream will melt just enough to bind to the cakes. Once it’s stacked, you’ll want to freeze for at least an hour before you frost the cake. This will ensure that the ice cream doesn’t melt as it goes through the decoration process.
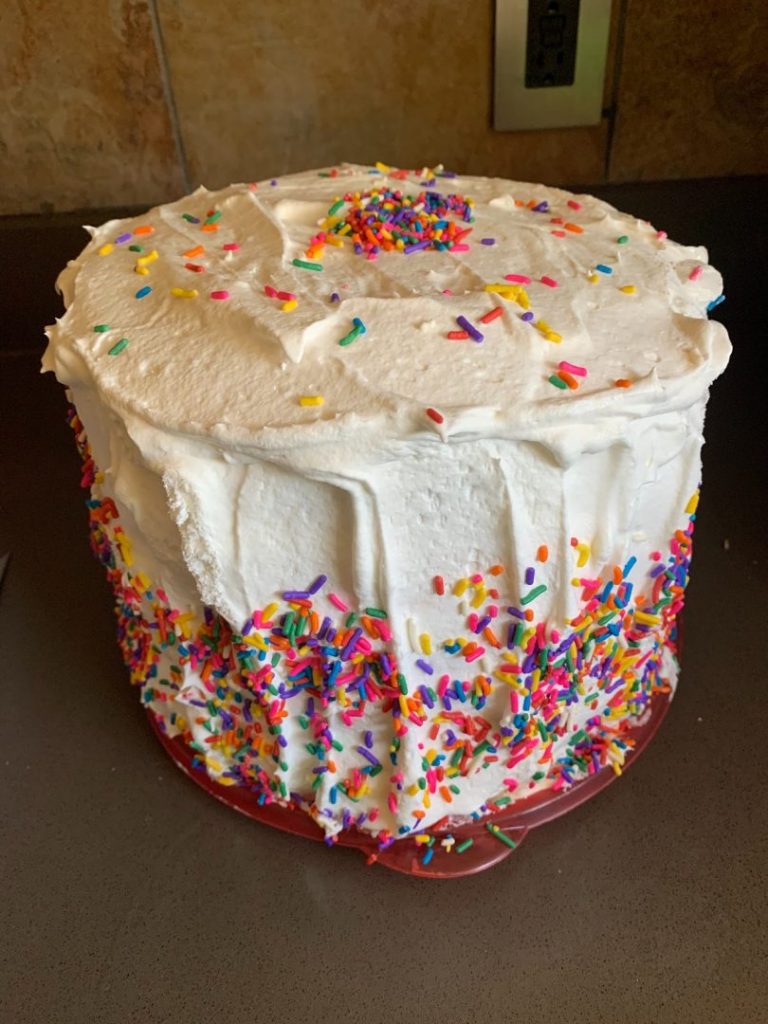
Step Five: Frost and Decorate
Cover the six-layer cake in whipped cream. You can smooth it out with a rubber spatula, or leave cool wave patterns in the whipped cream. Once it’s “frosted” in whipped cream, you can add candles, sprinkles, ice cream syrups (like caramel, chocolate, or strawberry) or any decorations you like! Pop it back in the freezer until you’re ready to serve!
The best thing about this cake is that you can serve large, six-layer pieces, OR you can separate the layers so each of the kids gets one layer of cake and one layer of ice cream! If you get fancy with the flavors, kids can choose which layer pair they want a slice of. It easily serves a family of 30!
I very much hope that you and your families enjoy my Aunt Dory’s Six-Layer Birthday Ice Cream Cake! If you do, check out my other fun blogs.